Showing posts with label WordPress Customization. Show all posts

4 Simple Steps to Develop a WordPress Child Theme

Recently, a WordPress Themes Survey has been conducted, and it comes to know that more than 85% of customers are customizing their themes, and only 35% of customers are using a child theme. Because of the less information and understanding about a child theme or difficulty of creating one, very less customers are making use of it.

When it comes to developing a child theme, it enables people to make their desired changes to their website without trying their hands on original theme’s code. Child theme can make it extremely easy for you to update your website without any risk of wiping out changes while you update.

Moreover, this type of theme comes with the functionality of its parent, and the best thing about it is that users can turn off their child theme and fall back on the parent theme any time. If you have decided to develop a WordPress child theme, below mentioned 4 simple steps are completely best that you can follow to customize your wordPress theme with child theme.


First – Get Started

One of the first major things that you need to do is develop a new folder in out themes directory in order to hold the child theme. With the help of cPanel or through FTP, one can easily do it. The themes directory is wp-content/themes.

Make sure to give the name to the folder without any space in the name. Well, it is quite common to use the name of the parent theme folder with “child” added on the end. After it, you have to create a file called style .css and it is the only file required to make a child theme. Ensure that the style sheet must start with below mentioned lines:

1. /*
2. Theme Name: Twenty Thirteen Child
3. Theme URI: http://wordpress.org/themes/twentythirteen
4. Description: Twenty Thirteen Child Theme
5. Author: WPMU
6. Author URI: http://wpmu.com
7. Template: twentythirteen
8. Version: 1.0.0
9. */
10. @import url("../twentythirteen/style.css");
11. /* =Theme customization starts here
12. -------------------------------------------------------------- */

Changing each of the single line is easily possible in order to suit your theme, but make sure to keep Theme Name and Template lines and the @import section. It is one such template that is the folder name of the parent theme.

Now, you can activate your child theme and make sure to login to your WordPress website and go to Appearances > Themes. In the obtainable list of themes, you can find your child theme and click activate. Now, you child theme must be the active theme.


Second – Modify Your Theme’s CSS

Now, your child theme is working like a treat and it can give a look like the parent theme as we have imported its CSS file. If you have decided to change the theme’s CSS, ensure that you add any changes to your website after the original theme’s CSS is loaded. Now, you can say that you wanted to change the text in the theme, so it is pink. You only have to do is add a line to the child themes CSS file:

/*
Theme Name: Twenty Thirteen Child
Theme URI: http://wordpress.org/themes/twentythirteen
Description: Twenty Thirteen Child Theme
Author: WPMU
Author URI: http://wpmu.com
Template: twentythirteen
Version: 1.0.0
*/
@import url("../twentythirteen/style.css");
/* =Theme customization starts here
-------------------------------------------------------------- */

p { color: #FFDFDD;}

By this change to the child theme’s CSS, the original CSS for the patent theme will overwrites. Now, you website looks like this:


Third - Edit the Functions.php File

At the themes main functions, you can find functions.php file that and if you are looking to add custom functions to your theme, you can easily do so by developing a new functions.php file under your child theme folder.

Not like style.css, the functions.php file in a child theme doesn’t supersede its counterpart from the parent. Now, your child theme’s functions.php file will initiate with a php opening tag and end with a php closing tag. However, you are allowed to add your own functions in between.

1. <?php

2. // Stick your php code in here

3. ?>

Fourth – Make sure to edit other themes files

Not like functions.php file, the functions for your theme are other PHP files are not imported automatically. By replacing the file with a copy, it is possible for you to edit other files as well.

Now, the original file of theme is ignored and the new one is used. If you are looking forward to make any changes to 4.0.php file, you need to make a copy of the old field and paste into the child theme. Now, you can make any changes as per your requirement, once the file has been copied.

So, these are the four east steps to develop a WordPress child theme. However, you can also hire a professional WordPress developer for it and get an excellent quality theme development service. You can contact here : info@perceptionsystem.com

13+ Brilliant WordPress Tutorials For Creating and Managing Your Own Site

Who’s got time to read boring books? Here are 13 best WordPress Tutorials that helps you to develop and manage your own site easily. Before moving towards tutorial section, continue reading what actually WordPress is.

13 Brilliant WordPress Tutorials For Creating and Managing Your Own Site

WordPress is an open source content management systems that based on PHP and MySQL. A plug-in architecture and a template system are some exceptional features added in WP. WordPress is one of the most popular blogging systems with more than 60 million websites on the Web.

Due to its huge popularity, there are uncountable WordPress tutorials available online. Check out some of the best collection given below:


1st How to Manage WordPress Posts with PHP? [ Part - 1 | Part - 2 ]


Harri Bell Thomas Tutorial

If you are looking to extend the basic functions of your WP site, then this tutorial is best for you. Going through this tutorial, you can able to 'Create WordPress Posts And Pages Using PHP' step-wise. Harri Bell-Thomas is an expert coder and graphic designer who has written this tutorials to help me and you. ;)


2nd How to Retrieve Posts with Multiple Taxonomies?

Go through this tutorial and simply stamp your data – in WordPress with multiple taxonomies. If you have queries related to custom post types, and custom taxonomies, then this tutorial is created for you only.


3rd How to Build Your Own Custom WordPress Search?

This tutorial helps you to create your own custom WordPress search and search out some exceptional well WordPress search secrets. Go through this post and know how to build a secondary search engine that has specific requirements.


4th How to Upload Files in WordPress?

This tutorial teaches how to upload file into a custom post type by using an input element instead of using the WordPress media uploader.


5th How To Change And Reference Various WordPress Directories?


Change And Reference Various WP Directories

This tutorial implements the wp-content directory and URL using constants in wp-config.php for editing wp-config.


6th How to Create a WordPress Team Page?

Do you want to create WordPress Team Page? Create WP team page with a couple of clicks from the WordPress admin UI and without writing a single line of PHP code. Look at this tutorial for more information.


7th How to Delete Files in WordPress?

Want to remove old files from WP? Simply go through this tutorial and learn how to remove the files and the Meta data easily.


8th How to Add Password Strength Meter Script?

Check out this tutorial and know how to use the WordPress' password strength meter in your own forms using the script.


9th How to Allow Guests To Post?


Allow Guests To Post

If you want to allow a guest or regular contributor to create a post without requiring access the WordPress admin interface, then this tutorial is especially created for you. Check out and add functionality.


10th How to improve WordPress comments?

This tutorial helps to enhance default WordPress comment behavior and give information about how to enhance the overall experience of improving WP comment section.


11st How to Create Static Front Pages in WordPress?

If you want to setup a static WP page then go through this tutorial as it taught about how to set it up within the context of the WordPress dashboard.


12nd How to Deactivate WordPress Multisite properly?

Check out this tutorial, if you want to grab an idea about how to remove any remaining sites, unwanted users, Multisite lines from WP Config and many more things.


13th 14 Handy WordPress Hacks


WordPress Hacks

On this 13th I like to dig more deeply with more 14 hacks. ;) Going through the list of above given tutorials, you will get to know how to manage particular WordPress features.

In comment, +AlexCooper has suggested more WordPress tutorials of WPEagle. They seem nice.

If you have some more tutorials that would help our readers, then tell us through comments.


Getting Problem in Testing WordPress Without Device? Read Following Tips

No matter you are a site owner or theme developer, you must require different devices to test your WordPress site. It would be excellent to have different varieties of devices for testing. However, if you don’t have then emulators are helpful. In this post, we are going to provide you different alternatives for setting up emulators for iOS and Android.

Testing WordPress Without Device

One of the daunting tasks for WordPress developers it is to test WP sites on different platforms. Getting a site that looks the same in every platform like IE6 is a bit difficult. Nowadays, businesses also want their site looks excellent tablets and smartphones. No doubt, responsive website helps to deal with every platform, but before launching or upgrading a site, it is must to test on basic platforms to make sure its effectiveness.

It would be nice to be able to keep an up-to-date library of cool gadgets to be able to test on but not only is this expensive it would probably mean that we’d never get any work done. There are many different types of tools available for testing different platforms. Moreover, it won’t hit productivity as well.

iOS Simulation For Testing iOS Devices

It is advisable to use Apple’s own iOS Simulator app for testing a site on the iOS devices. a site on the iOS devices is part of XCode, Apple's "integrated development environment…for developing software for OS X and iOS".

The simulator is a separate application that can be easily dragged to the dock and runs as needed without requiring starting XCode first every time. If you want to get XCode, you have to signing into an Apple Developer ID. Go to Downloads for Apple Developers for downloading XCode and write down ‘xcode’ and select an appropriate version for your running OS X. after downloading, follow below given steps to instal Xcode.

● Open a Finder Window and click on ‘Application’ option.

● Press Right-click on XCode and click on ‘Show Package Contents’ available in the context menu

● Now, Open Contents > Developer > Platforms > iPhoneSimulator.platform > Developer > Applications

● After that, see iOS Simulator listed and drag it to the Dock for easy assessment

● While opening the application, it will start as the previous device you simulated or iPhone you used first

● WordPress developer can easily change mobile device by clicking on the Hardware menu item and rotate it through same menus or by shortcut keys

● Click on the Hardware menu item to check WP site and enter your URL in the location bar.

Android Simulation On OSX / Windows

It is simple to access the Android Simulator, if it is insignificantly more complicated process to accessing the iOS Simulator but, is valuable effort. Now, we are going to install the Android SDK that available for different platforms like MS Windows and OS X. follow below given instruction for installing MS Windows and OS X:

● First of all, download the Android SK

● Run the installer on windows and unzip the download on a Mac

● Now, go to installed / unzipped folder and click on Tools > Android. Now, you will see a command prompt and the Android SDK Manager application will open

● After that, check the Android 4.3 folder and then, Install (x) Packages (It will take some time)

● Once installation process get completed, you have to set up virtual devices to simulate by click on Tools > Manage AVDs that is available at the SDK Manager menu

● Create your own or click on Device Definitions and then, choose a device and click on Create AVD and press OK. Now, you will see your device listed in the List of existing Android Virtual Devices

● Now, you have to highlight your device and press on ‘Start’ option. Ensure to determine the scale of display real size and click on ‘Launch’ option

Other Option:

BrowserStack, a web-based browser testing, is other option to test your website, if you don’t want to install the SDKs. One of the best things about this is it doesn’t installation for testing external websites. Developers can check a huge range of devices and platforms, adding browsers and desktop operating systems as well.

Conclusion:

Confused!! What option is best? It is up to you whether you go for installing the SDKs or BrowserStack. Adopting BrowserStack allows to test through one interface, including various desktop operating systems and browsers. So, if you are developing Ecommerce Website for Mobile Phones or any other site in WP, check out our option of testing your website.

Image Credit: smashingmagazine.com

WordPress Embellished with Collaboration & File Sharing Features with Cloudup Acquisition

WordPress is a free as well as open source blogging tool that based on PHP and MySQL to run on a web hosting services. Comes with numerous features, it is a great CMS and open source blogging tool that used by more than 18.9% of the top 10 million websites as of August 2013. However, this new CMS also embellished with many new features like collaboration, file sharing with cloudup acquisition and more.

WordPress Embellishment

Last month, WordPress.com's parent company Automattic added its main aim of world domination, which is powering most of the planets' websites with the buying of file-sharing startup Cloudup. Providing more information on these new features, Cloudup is still in its beta test stage, so it is not obtainable in the market for public. Mainly, this new features' technology is focused on helping you share videos, music, docs, images, drag and drop type environment.

One of the best things is that you can also share videos live with the audience at the time of uploading files with sync. The company decides to done this deal because WordPress clear interest in enhancing content and sharing. However, the terms of the attainment are not released. The company 'Automattic' is going to keep Cloudup in beta phase as well as will accept some additional 5000 beta users on the company' site.

However, WordPress also clarified that it will use Cloudup technology in order to generate wished elements of WordPress blog like collaborative editing, where two or more than two people can easily work on the same post. By considering this feature in mind, we can say that it is a big enhancement for blogs with different owners. If you are looking to edit another blog post of any person, who is already in it, you will be served with a warning of their presence and will get option to take over their post.

You can prevail their work if you have edited post of any person without knowing them. Previous month, Automattic founder Matt Mullenweg said that "he intended for WordPress to be the platform behind most of the world websites – an ambitious goal, but he already has about 20 percent, and his company's market share is growing by about two or three percent a year".

Wrapping Text:

Now, WordPress has been embellished with some new features like collaboration, file sharing and many more that will be extremely helpful for blog users. To get more information about WordPress and its features, you can continue your ready and make yourself aware about these features.

Is Using Robots.Txt File Tutorial for a WordPress Site Beneficial?

The robot text file, which is also known as robots.txt, is a very popular and long-running web standard that can be used to prevent Google and other popular search engines to access some parts of your website. Many of you all may think that why to block Google and other search engines from parts of your website.

The most common and important reason is to prevent Google from indexing pages on your website that are duplicates of pages. Apart from this, you can also prevent those pages that are not important for indexing like portfolio page, contact us and more.

Guide To Customize

As we all know that Google is penalizing sites that are with duplicate content. The other major reason is to prevent Google from linking to undefended premium content on your website. There are various, who like to prevent Google from using their images in Google search or from downloading large files so they can use robots.txt files.

Apart from this, if you are running a large authority WordPress website, Google may be loading the same page for several times with different names, using up a big part of your bandwidth and webserver computer processing power.


Guide To Customize

Through special robots.txt file, you can tell Google to only access those pages for only one time. With the help of robots.txt, you can tell Google about your XML or text site map as it indexes new pages on your website as quickly as it re-crawl your website.


Get Basic Information about Robots.Txt File:

In the root directory of a website, the robots.txt file is an optional file. In your robots.txt, you are also allowed to implement a crawl-delay: directive that helps to scale back bot crawling activity. Users of robots.txt can also add one or more sitemap: directives with a reference to your website’s sitemap or sitemaps.

At the time of editing this file, it is essential for you to be careful as you can mistake at this stage and block the search engines from accessing your website. Many of you may get a 404 file not found error which means you have made mistake anywhere and you don’t have a robots.txt file. You will see a simple text file with lines labeled user-agent, sitemap, comment lines, disallow, plus blank lines and more.

Guide To Customize

Get Robots.Txt File In WordPress:

Here, you can find some instructions that will work for you if you use WordPress to manage the root of directory of your website. It means your major blog doesn’t have any words in it after the domain name.

For an example if your main WordPress page is http://xyz.com, WordPress manages your robots.txt file. But if your main WordPress page is http://xyz.com/blog, may WordPress doesn’t manage your robots.txt file. Now, you need to work on it directly using FTP upload.

Guide To Customize


Robots.txt WordPress Plugins:

Is Using Robots.Txt File Tutorial for a WordPress Site Beneficial?On the web, you would find lots of SEO plug-ins that can create a robot.txt files that can be used very carefully as it can stop Google and other search engines to index your legitimate pages.

We can say that it is the silliest errors that can harm your website’s ranking. iRobots.txt SEO is a great plugin that can creates the robots.txt files. By using this generator, you cannot block or allow anything easy like a sitemap line to tell Google and other search engines to find your sitemap.


What You need to put in your WordPress Robots.Txt File?

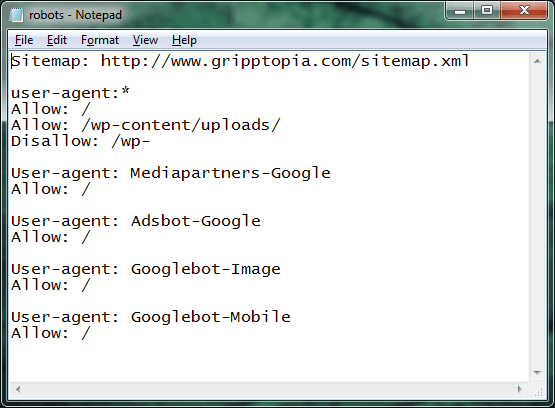
Generally, if you want to block WordPress login and help directories that all start with WP. You need to put this code under allow: or Disallow. You also need to add the following code:

Allow: /wp-content/uploads if you want your images to display in Google and Bing pictures.

Google will get only an error page when it tries to index a trackback, so add this code too:

Disallow: */trackback. It is better for you to use this line to enable Google to crawl all the content to get targeted ads if you are using Google Adsense.


Image Credit: flickr.com, searchengineland.com, gripptopia.com, wordpressians.com

Guide To Customize Your WordPress Theme with Child Theme

Are you using WordPress theme on your website? No matter whether it is a free or a commercial one, if you want to customize it as per your requirements, then it is easily possible for you. Finally, you have decided to custom your WordPress theme as per your business requirements, you can make use of Child Theme that allows to keep your changes, so you don't make changes to the original theme.

Guide To Customize

Before you opt for Child Theme, it is very much important for you to get complete information about it or how it works. There are lots of different reasons that WordPress developers have started using child themes.

It gives an opportunity to developers to customize a unique layout on top of another existing theme. Being a perfect solution for beginners, it enables people to play around with building their own themes that best meet with their business requirements.


What is Child Theme Exactly?

A WordPress child theme is a theme, which takes over the functionality of another theme that is also known as parent theme. Through this child theme, you are allowed to modify and add the functionality of that parent theme.

Being one of the safest ways to modify an existing them, child theme is also easy-to-use no matter whether you are looking to some minor changes or want to customize an entire theme. You can also develop a child theme instead of changing the theme files directly.

Generally, a child theme is a WordPress theme, which runs along with original WordPress theme and it overrule the parts of it as per your specified. Without changing the original one, you can easily modify with your required features.


Get Started with Child Themes

For your information, child themes are not as difficult as it sounds. One of the key benefits of using parent theme is that you do not have to write all the HTML/CSS from scratch. This theme automatically uses any template files that you have included like footer.php or sidebar.php. In any case, if you are missing, child theme will put all the same files from its parent.

However, this functionality also provides a complete range of features to customize already obtainable templates. This functionality is also excellent for touching up areas that are around your website for special events like adding designs for any special seasons like Christmas, Thanksgiving Day, New Years or more.


How to Do It?

Firstly, your original theme that is also known as parent theme, lives in your /wp-content/themes/directory. For an example: develop a child theme for WordPress default Twenty Twelve theme. After that, create a new directory along with the Twenty Twelve themes in order to develop a child theme.

Child Theme Directory

All the directories require inside to be a valid child theme that is a style.css files with the following content:


1
2
3
4
5
6
7
8
9
10
11

/*
Theme Name:     Twenty Twelve Child
Theme URI:      http://wpdailythemes.com/
Description:    Child theme for Twenty Twelve
Author:         Joseph
Template:       twentytwelve
Version:        1.0.0
*/
@import url("../twentytwelve/style.css");

Mainly, there are two important parts there:

Template: twentytwelve - that tells WordPress that this theme is a child theme of the twenty twelve theme.

@import url "/twentytwelve/style.css" that loads the parent theme style.css as a starting point.

Now, you can easily log into your WordPress dashboard and can see your Twenty Twelve Child Theme there and get it. Finally, you will get your very own Child Theme that has some cool features of your desire.


Got Your Own Child Theme & Thinking Now What to do?

Now, whenever you look forward to customize your own theme, you can do it in your child theme. In the parent theme, files in your child theme overrides files of the same name. So, if you want to change any file from your parent theme, you need to copy your child theme and then make your modifications there. The same goes for any template that may not be included in your parent theme. Now save them in your child theme and WordPress can use it.

So, this is the complete guide to customize Your WordPress theme using child theme that allows you to modify your theme with your desired features.

How WordPress as a CMS Helps You Take Effective Control of Your Site?

Today, it is very much important for you to have a website in order to show your work and find customers. However, it is quite difficult to develop and manage a website because of several reasons like big budget, you are not professional developer and you wanted to make your website in control.

WordPress Privacy

Across the world, there are lots of professionals, who hat to wait for experts to update their website so they are in search for such system that enables them to change their text by their own. Apart from adding text, they can add images, video and sound instantly.

Well, having such controls of website is not easily possible for you after all you are not a web developer. As we all know that website development is in very much demand as the market is exploding with beautiful and attractive designed websites that you can use to expand your business on the worldwide level.

To adorn these beautifully designs, you can use creative content that offer the magic ingredient X. when it comes online marketing, the best thing is that you are natural to develop media content that provide you a competitive benefits.

To develop a professional, affordable and best looking website, all you need is user-friendly CMS that maintains your website. You can make use of open source solution that widely used by millions of developers globally. When it comes to open source solution to develop a dedicated website or blog, you can opt for WordPress that takes full control of your website.

By using this CMS, you will come to know that how much control to exercise over their input. No matter whether you have website or blog, it is very much important to enabled comments and you can choose how much authority to exercise over the comments appearing on your posts. Many of you all have one of the most fundamental questions is whether to choose first approve a comment before it appears on your blog or.

● Leave unchecked -

Many times, you want to get the discussions going on. However, it is also possible that you know in advance that you are not around to moderate comments when a pre-scheduled post goes live that result in long queue of comments and an empty comment section.

Sometimes it is also possible that you are a beginning blogger and want your audience to remove any kind of difficulty to their feedback. In such condition, you need to let comments drip in as they are submitted since a lively comment section. You can also moderate your comments later after they have been published on your blog or website. You can remove if you find anything that is inappropriate.

● Check the box -

However, there are various bloggers and website owners for whom complete control of a post comment section is must. Various people prefer for particular types of comments like short, long, supportive and more and want to avoid such comments that are redundant or less-substantive.

If you are receiving comments regularly on your blog, it might be good for you to consider spacing them out to make the discussion more organic and boost its longevity. To approve each every comment may take your lots of time and work, but the reward is a blog which meets your personal preferences to perfection.

Apart from approving comments, you will also have the power of deciding whether to allow anonymous comments or rather you need visitors to offer their name and a valid email address.

To get more information on WordPress control, you can check-out this video and get more information:

14 Quick Tips To Make WordPress More Secure

One of the most popular platforms for sites, WordPress attracts number of webmasters to expand their business and take vantages of that. It becomes very common for every webmaster to get website hacked, so it is essential to take some precautionary steps to avoid such types activities occurred with your site. To sort out webmaster's problem, here we come with some quick tips that must webmaster taken into consideration to make their WordPress site secure.


1# Update Your WordPress themes and plug-ins regularly:

As a professional person connected with WP platform, you have better idea that some themes and plug-ins face vulnerabilities each month. So, it is advisable to update all your themes and plug-ins taking helps of WordPress developers. If you are not doing so, you might trap into hacker's nest.


2# Shift Your wp-config file one level up:

One of the excellent practices make by admin is to move their wp-config.php file one directory up. Before moving to one directory up, you have to ensure to get the permissions right.


3# Limit login attempts:

It is important to limit login attempts, so to avoid any brute force attacks. Having such type of security, you can easily keep strangers out to your site and make it more secure. You can also have option to install plug-in or select 'Add New' and find WP-DB-Backup option that mentioned above.


4# Mange Your WP with Strong User Password:

Most importantly, webmasters have to create a strong password no matter how much awareness is raised around the danger. You can also take help of online password generator for create strong password, using uppercase and lowercase letters, numbers and special characters.


5# Hide Your Username:

It becomes difficult task for user to guess both username and password. For your security, it is recommended to hide username by going through "Users" menu item in WP and go to each user for selecting an optional display name. You can create display name as your company name, your name or anything else.


6# Take Backup Regularly:

Taking backup of your website frequently is one of the wisest things you will do for your site. There are many different types of plug-ins available online that takes back up automatically. You just have to install them and use. After taking backup of your site, ensure to keep it at the most secure places or copy them to CDs.


7# Add 2-factor authentication to your site:

Add 2-factor authentication is another great ways to save your website from hackers. Having such option creates difficulty for hackers to access your admin page.


8# Add a firewall:

If you are unsatisfied with the level of protection WordPress and server scripts offer, then you have to add firewall in your WP website.


9# Scan Your Themes:

A collection of fantastic themes are available for WordPress. It doesn't mean that all are safe to use. Before implementing to your website, you must have to scan your theme files frequently to ensure there are no backdoors.


10# Observe files changes:

One shouldn't hack your website overnight. There are some intelligent hackers that plan for week before hacking any site. So, you have to be aware of that and observe all changes on your website to catch hackers before you deal with big loss.


11# Fight back against DDoS:

Sometimes, DDoS attacks can be horrible. So, webmasters have mitigated those types of threats by using mod_evasive to take evasive action while their site is being hacked by anonymous.


12# Implement third-party Services To Stop Attacks:

Another thing you can use for stopping spammers, SQL injection, and even DDoS attacks is implementing solutions like CloudFlare.


13# Check Out CSRF:

I know CSRF attack is new for you as we are not hearing about frequently. However, you have to make sure to protect your website against them. Such type of plug-in might be helpful for you to sort these problems.


14# Remove spam registrations:

Lastly, it is must to remove spam registration for security, if you are allowing registration option in your WP site. However, it is not a good option for every site, I know. Other thing you can do is install plug-ins to remove or block spam registrations.


So, above listed are 14 quick tips for making WordPress site more secure. Hope, you will implement these tips to your site to avoid hacking. If you are finding difficulty or have any other questions related to hacking and security, let us know through comment section.

SiteCore – An Excellent & Multi-functional .NET Content Mangement System

In the haste of providing better customer experience and shorten the time of customer acquisition, companies are looking for a unified platform that lets them provide the interactive customer engagement. A website is a platform with which companies can connect to the larger audience, utilize customer behavior and display the content relevant to the services and product it deals with. With changing customer patterns and technologies, it is required to have a website that offers required flexibility, scalability and ease of use to meet and support the requirements from time to time. This is where the role of CMS starts.

A good CMS or content management system delivers the required suppleness along with modular functionalities to ease the management of website and its content. There are many content management systems available such as Umbraco, Sitefinity, Sitecore, Magento, Dot Net Nuke, etc. which can transform the process of website content management and produce the expected online results with a wide array of features. Opting for any of these CMS is a tough task and requires one to define the priorities and features it is looking for in the CMS. While marketers and decision makers look for customer experience capabilities, developers and IT strategists give more weightage to dynamic infrastructure, tools, and capabilities for better performance.

Sitecore is the one which bears features of a great CMS. It is built on .Net framework and possesses remarkable features for today’s market-oriented websites. It offers enough customizations and convenience that lets your developers bend towards productivity in no time. Whether it is a corporate portal development or an online community website, Sitecore has all the features to accommodate your needs in an efficient manner. Besides these, what really separates Sitecore from other CMS is its out of the box functionalities and features which certainly mounts enough reasons to choose it above other CMS.

User-friendly Interface:

Sitecore has a simple yet intuitive Microsoft- Ribbon like user interface. With this easy-to-use user interface you can instantly make changes and updates in your website and portal even if you do not possess technical knowledge.


Integrated SEO Module:

Sitecore has an integrated SEO module to help you optimize your website from a Search Engine Perspective. It gives you an ability to optimize your content right in the editor and create SEO-friendly URLs so that you can leverage organic rankings in all the search engines.


Multisite Development:

Sitecore provides multisite management and content sharing capabilities across many sites. This can be beneficial for larger organizations seeking a single platform for managing their wide number of websites.


Seamless Integration:

Sitecore being based on Microsoft technologies supports out-of-the-box integration with various Microsoft business applications such as SharePoint, Dynamics CRM, Active Directory, etc. that fits your existing investment.


Cutting-Edge Development Environment:

Sitecore provides a powerful development environment to design and develop your websites and web applications leveraging .Net and XML standards. It is also compliant with World Wide Consortiums and supports Cascading Style Sheets giving you a cutting-edge development environment.


Multiple Device Friendly:

Sitecore features intelligent elements that repurpose the content in different formats and styles for different devices such as laptops, Smartphones, tablets, iPads, etc. Its unique shrinking and viewing standards automatically detects the devices and presents the content in the best possible view. Sitecore also has cross-browser compatibility to optimize the website view for multiple browsers such as Chrome, Firefox, IE, Opera, etc.


Internationalization:

Sitecore features multi-lingual capabilities to support the organizations spread globally in managing their content. It allows you to simplify the management of multiple language version sites and translation process in your native language with its powerful integration with Clay Tablet’s Rosetta Gateway and Lionbridge Technology’s Freeway.


Social Media Engagement:

Social Media Engagement

Sitecore CMS Solutions comes with social media engagement options to plug your site with a network like Facebook and LinkedIn, and continue the conversions across the social media. It also features pre-built components such as forums, polls, wikis, surveys etc. to help you nurture your own community.

Besides all these features, Sitecore supports cross channel target marketing, e-commerce and email marketing integration, multivariate testing background and much more.

Looking at all these features, we can say Sitecore gains a popularity of a preferred content management system for website and web application development with a right focus for developers, marketers, business owners and SEO specialists. It is an enterprise ready tool that can boost your online presence and drive you towards higher ROI. So, if you have decided to get Sitecore CMS based website, you need to make sure to go with CMS Experts, who has complete experience in this industry!!


Author:

Hi, this is Shrutika Bhatt working with Cygnet Infotech. I Love to write and share about Information Technology. Cygnet Infotech delivers technology-enabled business solutions that help companies to improve efficiencies in business processes.